DIY Paint Booth
Currently I have a project that requires a paint booth. The paint booth not only keeps dust to a minimum while painting, it also keeps over spray from getting all over the shop, and over spray is something you don’t want settling on the shelves when your dealing with a 2k (2 part = paint + activator) paint system that probably contains HEXAMETHYLENE DIISOCYANATE, ISOPHRONE DIISOCYANATE, or DIPHENYLMETHANE DIISOCYANATE. All 3 are not very good for you, and the over spray and fumes should try to be contained and exhausted out of the shop. If this over spray is allowed to linger, dry, and settle on the shelves, it could be kicked back up into the air and then your breathing it, so a paint booth is a must (at least for me it is).
The thing that gave me inspiration was a system that I seen in Hot Rod Magazine. I wanted something that I could take down and store until it was needed again. The product I seen was the ZipWall paint booth system. ZipWall also claims it can be a dust barrier.
On a side note I have seen these set up temporarily in back yards, just make sure that if you plan to do some back yard painting, that its not going to rain while you have this set up.
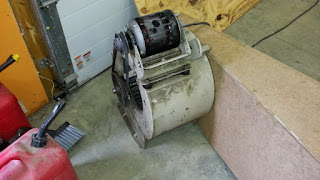
I started with this. It is an old squirrel cage fan from a furnace. notice the motor is open to the fumes (dangerous), and that is why its only ducted to the paint booth on one side. Even though I am only using one side of the fan, it flows more than enough air. It pulls enough that it sucks the sides of the plastic sheeting in but not enough for me to feel a draft.
I then did some research and figured out how I wanted to make my framework. I noticed that a ton of people built their makeshift paint booths out of PVC. I also seen guys use those cheep make shift garages from harbor freight. I wanted to be able change the dimensions for later jobs (larger or smaller) so I decided to go the PVC tubing route. I then started drawing my plans of the frame and figuring out how many elbows and T-fittings I needed. I decided to build my paint booth 12’W x 12’L x 8’H.
Only some of the joints are glued together. All the corners can be taken apart, to an extent. The reason for this is that, I want to be able to take this down and store it in the rafters after each use.
For the intake I used just ordinary furnace filters. They were cheep enough and should flow plenty of air. I just duct taped them in. Even though I will mop the night before I paint the filters were placed up high away from possible dust that could be on the floor.
The T-fittings and the elbow need to be glued permanently together, but not the long portions to the T or elbow. I discovered that if the T-fittings to elbow connections were left loose, the whole frame would want to flatten out or fall over. The long straight pieces I didn’t glue. I need to get those apart if I want to expand it for bigger jobs.
The next step was to cover it in plastic sheeting. Covering it was a task that actually took about 2 hours to do. I strongly recommend taping the whole length of the seam that meets the PVC tubing. I used the 12′ x 400′ painters plastic from Home Depot to cover it and duck tape. The painters plastic is about $25 for the box and I only used approximately 65feet of it. so I have enough plastic sheeting for at least 5 more set ups.
This paint booth is easy to set up and extremely affordable. It has the possibility of being expanded to a larger size to paint a car or truck. The home built paint booth can also be broken down and easily stored out of the way. For less than $100 its a very affordable paint booth.
1-1/4″ pvc elbow 9 pcs at $0.82 = $7.38
1-1/4″ pvc T-fitting 10 pcs at $0.73 = $7.30
1-1/4″ pvc coupling 8 pcs at $0.38 = $3.04
1-1/4″ pvc tubing 14 pcs at $3.09 = $43.26
Duct tape 2 pack $7.49
painters plastic roll of 12ft x 400ft $25 (Home Depot)
filters 2pcs at $0.68 = $1.36
TOTAL $94.83
And if you wanted to split hairs, I only used one roll of tape and 1/6th of the plastic. So with materials left over or ready to use for another time. The first time set up cost $70.26, and will cost me $9.28 next time I want to set it up (unless I want to expand it, then it will be more).
painters plastic 66ft of the roll $4.17
filters 2pcs at $0.68 = $1.36
Next setup cost = $9.28


Comments
Post a Comment